Monday, August 21, 2006

Celebrity Status Will Soon Follow..FAME? FORTUNE?


Check out the October 06' issue of Muscle Mustangs & Fast Fords!!!! Page 36 to be exact. Yes, I have been published in a major magazine. OK...OK...Its only a little paragraph, but it did mention the Blog and I have been getting LOTS of feedback about the Blog. I AM ALWAYS LOOKING FOR FEEDBACK....PARTS.....TECHNICAL INFORMATION...FREE STUFF...MORE FREE STUFF...ETC.
No updates on the car, I have been busy doing work on the house..Later for now.

Sunday, July 30, 2006

MONSTER TACH.....OH YEAH


Just a quick post. No car is complete without a MONSTER TACH to monitor the RPM's. Though the car is not complete..I got this cheap from a co-worker and I couldn't pass up it up......Later

Friday, July 28, 2006

Optimum Bite Off The Line


With the addition of these struts the basic suspension should be in place for some serious racing. The object of drag racing is to achieve sufficient weight transfer to the rear of the car, so the tires can get some good bite. These lakewood drag shocks are the 90/10 version, which means that they allow the front end to raise quickly off the line and set the front end down quickly to avoid too much air to get under the car. Another quick update.....Later.

Friday, July 21, 2006

Gas....it does an engine good


Just a quick post to keep everyone informed. The car is now running on 100 octane and wow has it woke up the engine even more. Throttle response is instant now and with all the chassis stiffening the car really feels solid. I have included a picture of the Lower Control Arms that I have acquired. These are from JDI Performance. Jeff and Dawn at JDI Performance where very helpful and the product looks pretty good. We will see how they function. The picture also has the polyurathane spring isolator bushings from Energy Suspension. These control arms and bushings should help with the wheel hop and help keep the rotation of the axle to a minimum.....and they look pretty good too. The upper control arms will come, but I am still doing some research on the best way to go with those. Later.......

Monday, July 17, 2006

Its All In The Prep


I was never a big believer in prep work, but as I have time and I am not in a big hurry, I am taking my time when painting new/used items. I always wondered why when I have painted engine parts and stuff in the past, I would always get runs, fish eyes, etc. When you take the time to scuff, clean and use self-etching primer on items, it really makes a big difference in appearance and how long it will last. I have included pictures of the Dual Snorkel Air Cleaner assembly I finished. Yes, I am going to use the original air cleaner assembly when racing. Independent test show that the factory air cleaner would flow about 535 CFM. Based on a quality air cleaner element (K&N) and a small change in the routing of the air tubes I can estimate a CFM flow of about 881. Based on my calculations, I should see a 2-4 tenth drop in the quarter mile times.
I can say one thing about taking this building a race car seriously..I am actually learning from this project. I am surprised on the amount of geometry, algebra, physics, etc that are needed to build a car. MY BRAIN HURTS....That's it for now.

Tuesday, July 11, 2006

Update..Update...where is the update???


Sorry for the delay but I have been busy with work and other things in life. I have included a picture of the interior, so that you can see the interior progress. I lost lots of weight in the interior, but as you can see, I have kept it pretty intact. The other pictures that you see include pictures of the Sub-Frame Connector. These are the bolt-in style, but they will get welded in the future. (I NEVER WANT TO PUT A SET ON AGAIN!!!!) As you can see as well, I have begun painting and repairing the bottom of the car. I have included some before and after photos. I also included a photo of the new "Torque Boxes" from JMI Performance. These are to support the bottom lower control arm mounts. I have primed em' and painted em' red to give some contrast to all that black under the car. It should go well with the black and red paint the car will have. Well, that is it for now....

Thursday, June 01, 2006

PLANTING THE POWER


I have been working to gather parts for the suspension. Here is what has been gathered up..so far. 1 set of Moroso Rear Trick Springs. I have included a diagram on what the springs should do to help plant power. As you can see by the picture, the rear springs are the black colored ones and one spring is longer than the other. This is the principal behind the the function of the springs. The passenger side has a tendency to plant all the power, so you get some twist and the car does not launch straight or plant the power evenly. These springs should help plant the power equally and make the car launch straight. The shocks in the picture are some Competition Engineering Rear Shocks. They are adjustable in 3-ways 50/50;40/60; and 30/70. These ratios represent the percentage of force required to compress and extend the shock unit. I'll probably set the rear at 50/50, this seems to be the best place to start and I'll adjust as needed. The yellow springs are for the front end. These are springs from Laurel Mountain Mustang. The springs help in weight transfer to the rear of the car, helping with the planting of the power. I have yet to find a set of front shocks...well I can find em' I just don't want to pay for em'. I'll keep looking because patients has paid off so far. I have also got a set of new Energy Suspension Coil Spring Isolators and Isolator Set for the front springs...The guy on Ebay threw them in with purchase of the springs. That saved me $25. SCORE. FREEBEE. Ok, so here are some great parts, I just hope I get them on soon and hopefully they work.

Friday, May 12, 2006

Leftovers


Look at the "spares" now. I had some center's laying around in a box and I have been meaning to put them on Ebay, but for a recycling job, they look pretty good. I had to trim some of the lip and "bond" them to the wheel, but it looks pretty good. They look offcenter in the picture, but they actually aren't. Hey, nobody will be looking at the cap when I am flying by anyway.
Here is something that you might find interesting. My ShopVac was full of debris. Why is that interesting you ask? Well it weighed almost 2 pounds. I know I am stretching here, but can you believe that you could have almost 3 pounds of sand, mud, hairpins, change, loose metal, sound deadener, screws and other interesting items hiding throughout your vehicle? That's it for now. Two days in a row on posting. I can't make this a habit.

Thursday, May 11, 2006

I Did It One Piece At A Time!


As Johnny Cash would say, " I did it one piece at a time and it didn't cost me a dime." Well, it is costing me, but as cheaply as possible. What you see above is the "budget" front runner for 4 lug fox-body cars. These aluminum wheels where used on several ford vehicles as spare tire wheels to reduce overall weight in the cars, and when you can locate them, they make a cheap alternative to buying the "high dollar" branded wheels. You can easily spend $400.00 for a set for the front. My cost? Rims and tires? $120. This by far has been my biggest expense, but it helped in several categories. I saved 10 pounds per tire and 11 pounds per wheel. That's 42 more pounds off the car. Ok, for those that are not keeping track of the weight reduction. We are now at a total of 452 pounds of stuff being removed from the car. As for me, I have now lost 29 pounds. So, in theory, that's 481 pounds the car doesn't have to carry around anymore. For those that need to know. I was 217 pounds in January 2006, as of May 2006 I was 188 pounds. At 6'3" I am looking like I used to a LONGGGGGGG time ago.
The "skinny" tires will also help with the rolling resistance the car has , so in theory, I should be able to pick-up some time and some MPH down the track. Also, they look pretty good. Maybe I'll get the time to throw them on the car in the next several days. SEE YA>>>>>

Monday, May 08, 2006

SUPER SIZE ME!!!!


Hey, just a quick post. If you click on the pictures, you can super size the pictures to get more detail. Or see more stuff I missed. HA!! HA!!

It's Running Again


Ok, I have put the gas tank back in and the car started right-up. Before I installed the tank I did put new fuel line and clamps on. I had lots of problems finding hardware to put the tank back in, but thanks to Lowes and some creative thinking I managed to create some new body clips to hold the straps to the body. The originals broke and they are a part that is no longer available. I am also replacing any bolts with grade 8 bolts when I can. The local hardware store is going out of business, so I have been able to get some good deals on the bolts. By the way, it sucks putting a gas tank back in by yourself.
I Include some pictures of what the area looked like before and after. I scuffed the area with a 3M pad and removed any of the "flaky" rust. I then wiped it done with some 3M metal prep and proceeded to paint the area with some Silver Bullet. (Visit rustbullet.com) for more info on the product. The stuff required 2 coats as the manufacturer recommended and I then waited 24 hours for the stuff to cure and sprayed it with some flat black. It doesn't look to bad for the area that I did. I am doing sections at a time, so nobody give me a hard time about the areas that are not done. I have been gathering several pieces for the suspension, so hopefully by the next post I'll be able to show you what I have done with that.

Tuesday, April 25, 2006

Nothing Ever Goes As Planned


Well, it has been 21 days since my last post. I knew this was going to take forever.........My plan was to take the gas tank out, so that I could clean up underneath the car and install the suspension components a little easier. This did not happen as planned. 23 years of decay and gunk have taken easy jobs and turned them into a ALL DAY affairs. The gas tank in these things are held in with two straps bolted to the frame. Simple 30 minute job and the tank is out. How about THREE HOURS. Bolts broke...etc...etc. After the tank was out, you guessed it, I found a crack in the gas tank, nothing major, but a definent setback. So, after repairing the tank and letting it cure for several days it is leak free and has a new coat of paint. I have included a picture for your viewing. This has been my excitement with the car over the last several weeks. I have been extremely busy and have had extra things going on around the house...oh... like water heater replacements, but things are coming along and I hope to have the rear suspension improved by my next post. Until then......

Tuesday, April 04, 2006

The First Before/After


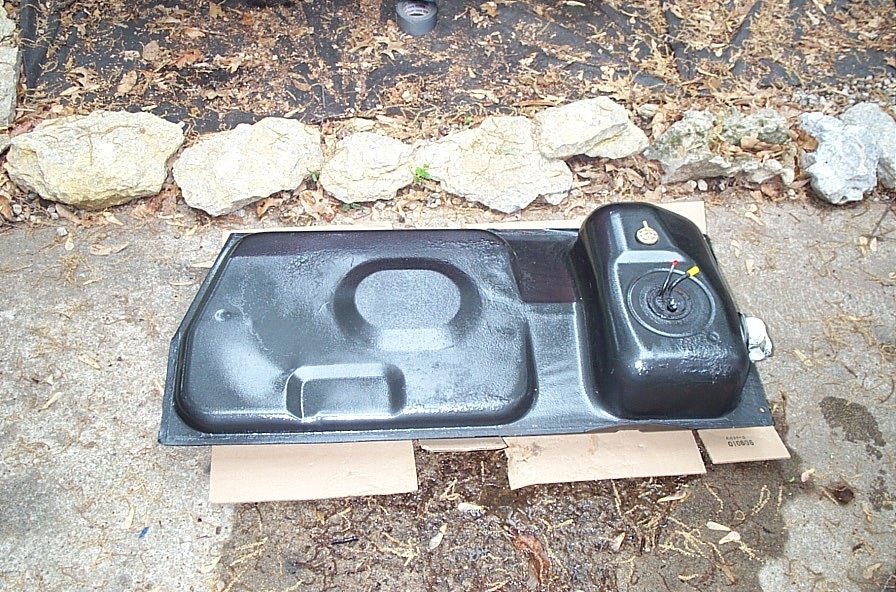
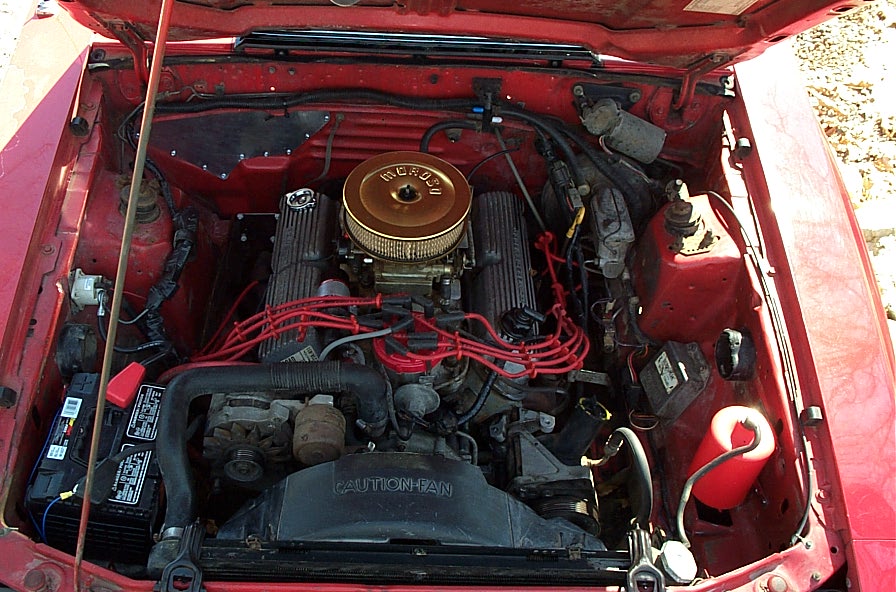
I decided to post a before and after photo of the engine bay. People at my work think that I realy don't have a car and they need more proof that not only do I have this car, but that I actually work on it. First. I did remove another 47 pounds off of the car. This weight came off the front off the car this time not the interior.
Well, as you can see there is a difference between the engine bay before and after. I have added a MSD Blaster Coil, MSD Cap, MSD Rotor,NGK Plugs, and Jeg's 8mm wires. NO MSD IGNITION BOX? NO! The Duraspark ignition by Ford is actually a very efficient ignition. I don't plan on running NOS or anything, right now, so I'll save the cash. Believe it or not I had these parts left from the 88 Mustang I had once. (4 years ago). The old anti-freeze catch can has been replaced by a JAZ catch can($5.00 swap meet part). New Battery(courtesy of Wal-Mart---FREE by the way...I know the manager that "sponsored" me. If you look to the back firewall, you can see my aluminum fabrication. The aluminum is covering all the holes that where left after taking out the heater core, AC, and other components. The Moroso air cleaner is a Ebay find and is temporary for now.
Not a lot of fancy stuff under the hood here. It doesn't make the car go faster, so why waste the cash. Bye for now.

Saturday, April 01, 2006

Went For A Drive


OK, removed another 12 pounds of the car today, for those that are not keeping track, that's 363 pounds of weight off the vehicle so far. I have a long way to go. I myself have lost 27 pounds...so....in theory that's 390 pounds the car won't carry anymore.
Exhaust is on, the car is tuned, so we went for a ride. The neighbor (he has a nice 80's Elcamino running 12.20's in the quarter mile) said when I took of the right rear tire came off the ground. The car had massive wheel hop. it looks like I will need to do some research on suspension. I did get the tires to bark in 3rd gear..so it seems the motor is running pretty strong. There is LOTS of body flex, so sub-frame connectors are next. There is also lots of engine movement, so I am going to work on a torque strap tomorrow. They cost $55.00 in most mail-order sites. I think I can do it for about $8.00. I will include a picture of one I will try to fabricate.
I have been asked by some web-surfers to list modifications done to the car so far. I'll work on this so others may duplicate the mod's or whatever they want to do with the info.

Friday, March 31, 2006

New info and Money Spent


It has been several weeks since my last post, but it has been crazy at work and at home. I have not had much time to work on the Capri, but I have actually spent some money, but of coarse, I did it "as cheaply as possible." What we have here in the photo is a "homemade" dump system. MAC sells one for about $218.00 and Holley sells a system for $159.00. I put one together for....$65.00. The Flowtech Afterburner mufflers where a swap meet find(these are used on the Holley System). By the way 5.0 magazine did a test on these mufflers in 2002?? And there was only a 2hp drop over straight pipes. They flow really well and have a very aggressive tone from what I remember. I actually had a "Racetruck" exhaust with these mufflers for my 95 Chevy years ago that was LOUD and had a noticeable increase in performance.
I scored the flowtech starter tubes for Mustangs/Capri's at the local speedshop. I LOVE THAT PLACE. The place is FULL of old former race car folks, one was even a crew for several top fuel drag teams in the 70's-80's. He is very knowledgeable about fox-body stuff and I will use him to pull lots of knowledge from if I can. I will put the system on Sunday and see how she sounds. I will figure out how to do sound on this blog and post the results. I am working on the underside of the car and will post pics when everything is done, installed, and looking somewhat presentable. The car has 23 years of "GUNK" under the car. Your car will pass tech inspection at the track a lot easier with a clean presentable car, than a dirty car. Anyway, that is it for now....Oh I did remove another 25 pounds of the car as well over the last several weeks too. I am also looking for suggestions on what to name the car. Because of the mixing of parts...I am thinking THE MUTANT MERCURY???? Throw some suggestions my way. SEE YA

Tuesday, March 14, 2006

The weight keeps coming off!!!


As you can see by the can I have taken more weight from the inside if the car, 93 pounds to be exact. That brings the total to 326 pounds from the inside of the car. The picture of the inside back of the car shows I have kept the interior intact, amazing what is underneath those panels to keep road noise down. I am currently working on a template to finish my rear seat delete. I see these things on the internet and in catalogs for over $100.00. I'll do it for about $20.00 in materials. I wanted to show by the pic that I am totally not "gutting" the interior, I still want it to look "stock." I'll post more pics of the entire interior when I get it complete. Guess what? Still no money has been spent on the project, though 11 hours of my time has been captured by the car.

Friday, March 10, 2006

Weight Is Your Enemy


It is well known in the drag racing community that for every 100 pounds you can lose off your car, you can gain .1 of a second down the track. Well as you can see by the pic, the process has started and it hasn't cost me a dime. That trash can has 83 pounds of stuff in it. I am weighing everything I take off the car and keeping track of my weight savings. So far, I have eliminated 233 pounds off the car and I have barley scratched the surface in eliminating the stuff that is not needed. Well, that's it for now. I'll post some before and after pics of the interior once I get it completed.

Wednesday, March 08, 2006

The Beginning


This is my first attempt at this internet stuff and since everyone is doing it, I felt it was my turn. What we have here is a 1983 Mercury Capri RS, which was given to me by my sister. (YES FOR FREE) I was shocked myself. You could say that this build-up will be dedicated to her and the fact that she is the coolest sister out there. I have no clue exactly what modifications I will do, but you can be sure it will be done "as cheaply as possible."